KeyAdaptiveSharpen=101,0,0,0
KeyBloomAndLensFlares=102,0,0,0
KeyLumaSharpen=0,0,0,0
KeyDaltonize=0,0,0,0
KeyAmbientLight=100,0,0,0
KeyGP65CJ042DOF=0,0,0,0
KeyDeband=0,0,0,0
KeyClarity=0,0,0,0
KeyCartoon=0,0,0,0
KeyBorder=97,0,0,0
KeyTonemap=0,0,0,0
KeyColourfulness=0,0,0,0
KeyCA=0,0,0,0
KeyMode3=0,0,0,0
KeyColorMatrix=0,0,0,0
KeySMAA=0,0,0,0
KeyTechnicolor2=98,0,0,0
KeyAdvancedCRT=0,0,0,0
KeyCurves=0,0,0,0
KeyKNearestNeighbors=0,0,0,0
KeyNonLocalMeans=0,0,0,0
KeyRingDOF=0,0,0,0
KeyMagicDOF=0,0,0,0
KeyMatsoDOF=111,0,0,0
KeyFilmGrain=99,0,0,0
KeyFilmGrain2=0,0,0,0
KeyMXAO=0,0,0,0
KeyMartyMcFlyDOF=0,0,0,0
KeyDPX=0,0,0,0
KeyEmphasize=0,0,0,0
KeyFilmicPass=0,0,0,0
KeyMode1=0,0,0,0
KeyMode2=0,0,0,0
KeyMotionBlur=0,0,0,0
KeyFXAA=0,0,0,0
KeyGaussianBlur=0,0,0,0
KeyHDR=0,0,0,0
KeyVibrance=0,0,0,0
KeyHighPassSharp=0,0,0,0
KeyLevels=0,0,0,0
KeyHQ4X=0,0,0,0
KeyLiftGammaGain=0,0,0,0
KeyLightDoF_AutoFocus=0,0,0,0
KeyLightDoF_Far=0,0,0,0
KeyLightDoF_Near=0,0,0,0
KeyTechnicolor=0,0,0,0
KeyLUT=0,0,0,0
KeyMonochrome=0,0,0,0
KeyReflectiveBumpmapping=0,0,0,0
KeyTint=0,0,0,0
KeyTiltShift=0,0,0,0
KeySurfaceBlur=0,0,0,0
KeyVignette=106,0,0,0
Techniques=AdaptiveSharpen,Border,Clarity,HDR,Tonemap,Deband,Technicolor2,MatsoDOF,FilmGrain,BloomAndLensFlares,Vignette
[Border.fx]
border_width=0.000000,35.000000
border_ratio=2.350000
border_color=0.000000,0.000000,0.000000
[Clarity.fx]
ClarityRadius=3.000000
ClarityBlendMode=2.000000
ClarityOffset=2.000000
ClarityDarkIntensity=0.000000
ClarityBlendIfDark=50.000000
ClarityBlendIfLight=205.000000
ClarityViewBlendIfMask=0.000000
ClarityStrength=1.000000
ClarityLightIntensity=0.000000
ClarityViewMask=0.000000
[HQ4X.fx]
s=1.500000
k=-1.100000
mx=1.000000
max_w=0.750000
min_w=0.030000
lum_add=0.330000
[AdaptiveSharpen.fx]
curve_height=0.400000
L_compr_low=0.169000
D_compr_low=0.010000
curveslope=0.400000
L_overshoot=0.003000
D_overshoot=0.009000
L_compr_high=0.300000
D_compr_high=0.500000
max_scale_lim=0.100000
pm_p=0.750000
[AmbientLight.fx]
alDebug=0.000000
alAdaptBaseMult=1.000000
alInt=7.000000
AL_DirtTex=0.000000
alThreshold=15.000001
AL_Adaptation=-1.000000
alAdapt=1.520000
AL_Dirt=-1.000000
alAdaptBaseBlackLvL=3.000000
alLensThresh=0.380000
AL_Vibrance=0.000000
AL_Adaptive=2.000000
alDirtInt=1.160000
alDirtOVInt=1.000000
alLensInt=2.000000
AL_Lens=-1.000000
[CRT.fx]
Resolution=1.150000
Gamma=2.400000
Brightness=0.900000
Curvature=0.000000
MonitorGamma=2.200000
ScanlineIntensity=2.000000
ScanlineGaussian=1.000000
CornerSize=0.010000
CurvatureRadius=1.500000
ViewerDistance=2.000000
Angle=0.000000,0.000000
Overscan=1.010000
Oversample=1.000000
[Bloom.fx]
bGodrayEnable=0.000000
iBloomMixmode=1.000000
fBloomSaturation=1.200000
bAnamFlareEnable=0.000000
fBloomThreshold=0.782000
fBloomAmount=0.600000
fLensdirtSaturation=2.000000
fBloomTint=0.588235,0.588235,0.811765
fLensdirtIntensity=0.400000
bLensdirtEnable=0.000000
fFlareLuminance=0.095000
iLensdirtMixmode=2.000000
fLensdirtTint=1.000000,1.000000,1.000000
bLenzEnable=0.000000
fAnamFlareThreshold=0.900000
fAnamFlareWideness=2.400000
fAnamFlareAmount=14.500000
fAnamFlareCurve=1.200000
fAnamFlareColor=0.012000,0.313000,0.588000
fLenzIntensity=1.000000
fLenzThreshold=0.800000
bChapFlareEnable=0.000000
fChapFlareTreshold=0.900000
iChapFlareCount=15.000000
fChapFlareDispersal=0.250000
fChapFlareSize=0.450000
fFlareIntensity=2.070000
fChapFlareCA=0.000000,0.010000,0.020000
fChapFlareIntensity=100.000000
fGodrayDecay=0.990000
fGodrayExposure=1.000000
fGodrayWeight=1.250000
fGodrayDensity=1.000000
fGodrayThreshold=0.900000
iGodraySamples=128.000000
fFlareBlur=200.000000
fFlareTint=0.137000,0.216000,1.000000
[ColorMatrix.fx]
ColorMatrix_Red=0.817000,0.183000,0.000000
ColorMatrix_Green=0.333000,0.667000,0.000000
ColorMatrix_Blue=0.000000,0.125000,0.875000
Strength=1.000000
[Cartoon.fx]
Power=1.500000
EdgeSlope=1.500000
[Sepia.fx]
Tint=0.550000,0.430000,0.420000
Strength=0.580000
[CA.fx]
Shift=2.500000,-0.500000
Strength=0.500000
[Colourfulness.fx]
colourfulness=0.400000
lim_luma=0.700000
[Curves.fx]
Mode=0.000000
Formula=4.000000
Contrast=0.650000
[SurfaceBlur.fx]
BlurRadius=1.000000
BlurOffset=1.000000
BlurEdge=0.500000
BlurStrength=1.000000
[Daltonize.fx]
Type=0.000000
[Deband.fx]
Threshold=0.004000
Range=16.000000
Iterations=2.000000
Grain=0.006000
[Denoise.fx]
NoiseLevel=0.150000
LerpCoefficeint=0.800000
WeightThreshold=0.030000
CounterThreshold=0.050000
GaussianSigma=50.000000
[DOF.fx]
fADOF_ShapeCurvatureAmount=0.410000
DOF_AUTOFOCUS=-1.000000
DOF_FARBLURCURVE=1000.000000
DOF_MOUSEDRIVEN_AF=0.000000
fGPDOFBiasCurve=2.000000
DOF_FOCUSPOINT=0.500000,0.450000
fGPDOFChromaAmount=0.400000
DOF_INFINITEFOCUS=0.001000
DOF_MANUALFOCUSDEPTH=1.000000
DOF_FOCUSSAMPLES=10.000000
bADOF_ShapeApertureEnable=0.000000
DOF_NEARBLURCURVE=10.495001
DOF_FOCUSRADIUS=0.000000
fRingDOFFringe=0.500000
bGPDOFPolygonalBokeh=-1.000000
fGPDOFBrightnessMultiplier=2.000000
DOF_BLURRADIUS=50.020004
iRingDOFSamples=30.000000
fADOF_BokehCurve=4.040000
iRingDOFRings=8.000000
fRingDOFThreshold=0.700000
fGPDOFBrightnessThreshold=0.500000
fRingDOFGain=30.000002
bADOF_ShapeCurvatureEnable=-1.000000
fRingDOFBias=2.000000
iMagicDOFBlurQuality=8.000000
bADOF_ImageChromaEnable=0.000000
fMagicDOFColorCurve=10.000000
iGPDOFQuality=6.000000
iGPDOFPolygonCount=5.000000
fADOF_ShapeRotation=0.000000
fADOF_ShapeChromaAmount=0.125000
fGPDOFBias=10.000000
bMatsoDOFChromaEnable=-1.000000
fADOF_SmootheningAmount=0.500000
fMatsoDOFChromaPow=0.200000
fMatsoDOFBokehCurve=9.470000
iMatsoDOFBokehQuality=10.000000
iADOF_ShapeQuality=255.000000
fMatsoDOFBokehAngle=360.000031
bADOF_RotAnimationEnable=-1.000000
fADOF_RotAnimationSpeed=5.000000
fADOF_ShapeApertureAmount=1.000000
fADOF_ShapeWeightAmount=1.000000
bADOF_ShapeAnamorphEnable=0.000000
fADOF_ShapeAnamorphRatio=0.050000
bADOF_ShapeDistortEnable=0.000000
fADOF_ShapeDistortAmount=0.200000
fADOF_ShapeWeightCurve=6.500000
bADOF_ShapeChromaEnable=0.000000
bADOF_ShapeDiffusionEnable=-1.000000
fADOF_ShapeDiffusionAmount=1.000000
bADOF_ShapeWeightEnable=0.000000
iADOF_ShapeChromaMode=3.000000
iADOF_ImageChromaHues=5.000000
fADOF_ImageChromaCurve=1.625000
fADOF_ImageChromaAmount=3.078000
[DPX.fx]
RGB_Curve=8.000000,8.000000,8.000000
Strength=0.200000
RGB_C=0.360000,0.360000,0.340000
Contrast=0.100000
Saturation=3.000000
Colorfulness=2.500000
[Vignette.fx]
Type=0.000000
Ratio=2.229000
Center=0.500000,0.500000
Radius=2.000000
Amount=-2.000000
Slope=5.000000
[Emphasize.fx]
ManualFocusDepth=0.026000
FocusRangeDepth=0.010000
FocusEdgeDepth=0.050000
BlendColor=0.000000,0.000000,0.000000
EffectFactor=0.900000
BlendFactor=0.000000
[FilmGrain.fx]
Intensity=0.300000
Variance=0.500000
Mean=0.500000
SignalToNoiseRatio=2.000000
[FilmGrain2.fx]
grainamount=0.050000
coloramount=0.600000
lumamount=1.000000
grainsize=1.600000
[FilmicPass.fx]
Strength=0.850000
Linearization=0.500000
Fade=0.400000
Contrast=1.000000
Bleach=0.000000
Saturation=-0.150000
RedCurve=1.000000
GreenCurve=1.000000
BlueCurve=1.000000
BaseCurve=1.500000
BaseGamma=1.000000
EffectGamma=0.650000
EffectGammaR=1.000000
EffectGammaG=1.000000
EffectGammaB=1.000000
LumCoeff=0.212656,0.715158,0.072186
[FineSharp.fx]
sstr=2.000000
cstr=0.900000
xstr=0.190000
pstr=1.272000
xrep=0.250000
lstr=1.490000
[SMAA.fx]
EdgeDetectionType=1.000000
EdgeDetectionThreshold=0.100000
MaxSearchSteps=98.000000
MaxSearchStepsDiagonal=16.000000
CornerRounding=0.000000
DebugOutput=0.000000
[FXAA.fx]
Subpix=0.250000
EdgeThreshold=0.125000
EdgeThresholdMin=0.000000
[GaussianBlur.fx]
GaussianBlurRadius=2.000000
GaussianBlurOffset=1.000000
GaussianBlurStrength=0.170000
[HDR.fx]
HDRPower=1.300000
radius1=0.873000
radius2=0.870000
[HighPassSharpen.fx]
HighPassSharpRadius=1.000000
HighPassSharpOffset=1.000000
HighPassViewBlendIfMask=0.000000
HighPassBlendIfDark=0.000000
HighPassBlendMode=1.000000
HighPassBlendIfLight=255.000000
HighPassSharpStrength=0.400000
HighPassDarkIntensity=1.000000
HighPassLightIntensity=1.000000
HighPassViewSharpMask=0.000000
[Levels.fx]
BlackPoint=16.000000
WhitePoint=235.000000
HighlightClipping=0.000000
[LUT.fx]
fLUT_AmountChroma=0.000000
fLUT_AmountLuma=0.000000
[LiftGammaGain.fx]
RGB_Lift=1.000000,1.000000,1.000000
RGB_Gamma=1.000000,1.000000,1.000000
RGB_Gain=1.000000,1.000000,1.000000
[TiltShift.fx]
Line=0.000000
BlurMultiplier=10.000000
Axis=0.000000
Offset=0.000000
BlurCurve=1.000000
[LightDoF.fx]
fLightDoF_Width=5.000000
fLightDoF_Amount=10.000000
f2LightDoF_CA=0.000000,1.000000
f2Bokeh_AutoFocusCenter=0.500000,0.500000
bLightDoF_UseCA=0.000000
bLightDoF_AutoFocus=1.000000
fLightDoF_AutoFocusSpeed=0.100000
bLightDoF_UseMouseFocus=0.000000
fLightDoF_ManualFocus=0.000000
[MXAO.fx]
fMXAOAmbientOcclusionAmount=2.000000
bMXAOSmoothNormalsEnable=0.000000
fMXAOIndirectLightingAmount=4.000000
fMXAOFadeoutStart=0.200000
iMXAOBayerDitherLevel=3.000000
fMXAONormalBias=0.200000
fMXAOIndirectLightingSaturation=1.000000
iMXAOSampleCount=24.000000
fMXAOSampleRadius=2.500000
fMXAOBlurSharpness=2.000000
fMXAOBlurSteps=2.000000
bMXAODebugViewEnable=0.000000
fMXAOFadeoutEnd=0.400000
[LumaSharpen.fx]
sharp_strength=0.650000
pattern=1.000000
sharp_clamp=0.035000
offset_bias=1.000000
show_sharpen=0.000000
[Monochrome.fx]
Coefficients=0.210000,0.720000,0.070000
ColorSaturation=0.000000
[MotionBlur.fx]
mbRecall=0.400000
mbSoftness=1.000000
[RBM.fx]
fRBM_BlurWidthPixels=100.000000
iRBM_SampleCount=32.000000
fRBM_LowerThreshold=0.100000
fRBM_ReliefHeight=0.300000
fRBM_ColorMask_Orange=1.000000
fRBM_FresnelReflectance=0.300000
fRBM_FresnelMult=0.500000
fRBM_UpperThreshold=0.200000
fRBM_ColorMask_Red=1.000000
fRBM_ColorMask_Yellow=1.000000
fRBM_ColorMask_Green=1.000000
fRBM_ColorMask_Cyan=1.000000
fRBM_ColorMask_Blue=1.000000
fRBM_ColorMask_Magenta=1.000000
[Technicolor.fx]
Power=11.000000
RGBNegativeAmount=0.392157,1.000000,10.058824
Strength=0.500000
[Technicolor2.fx]
ColorStrength=0.827451,0.674510,1.176471
Saturation=0.510000
Brightness=1.220000
Strength=0.700000
[Tonemap.fx]
Gamma=0.800000
Bleach=0.000000
Defog=0.000000
Exposure=0.100000
Saturation=-0.000000
FogColor=0.000000,0.000000,1.000000
[Vibrance.fx]
Vibrance=0.150000
VibranceRGBBalance=1.000000,1.000000,1.000000


Mod Page
@yohozheng12 Please check the preset page in about 5 min.
Never forgot about your request, just had no idea how to begin fulfilling it. Well, i'm posting my WIP so far. Hope you like it, friend.
Cheers!
-Merc
@yohozheng12 Please check the preset page in about 5 min.
Never forgot about your request, just had no idea how to begin fulfilling it. Well, i'm posting my WIP so far. Hope you like it, friend.
Cheers!
-Merc
You could also just do the long-form install method. It's the best way, really, but I put the link up for convenience.
Hey all,
It looks like some files weren't copying over from the reshade-shaders folder. I think i've fixed the issue now so go to the link and redownload if your game doesn't look like mine. Or compare the files in you reshade-shaders/shaders folder to the new link to make sure you have all the files.
Let me know if you're having any issues and feedback on the preset, please.
@yohozheng Yea that very helpful, I see exactly what you mean. Is like the browns are all kinda gray instead or there's a l gray filter on everything. I like that aesthetic a lot.
I'll see what I can do. I don't exactly know if it's possible to do this with reshade. I think so.
@AssassinsDecree
https://www.youtube.com/watch?v=Tqz0q2BKl-U
This may help you.
@AssassinsDecree I think without the DOF,the hardest thing is the different tone between the trailer and vanilla game. In the trailer the tone more gray.I am not really sure,so hope you can figure it out~~~
@yohozheng12
Hey thank you so much!
I think I might be able to make something similar but let's make sure we're on the same page first. Is this the trailer?
https://youtu.be/WdJub3Kz2wI
The hardest thing will be the slight use of a depth of field that's used throughout the trailer. I'm still trying to figure out how DoF works in general so I can add to this preset.
Besides the DoF, the trailer footage seems kinds close to the vanilla game. Can you point out some of the biggest differences you would want to see in a E3 2015 reshade?
Thanks again!
@AssassinsDecree Amazing!
Can you try to make a preset like E3 2015 trailer?
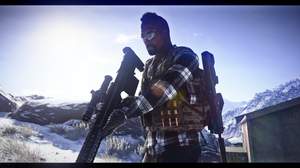
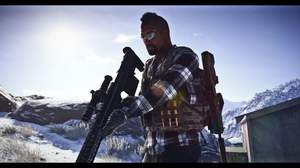
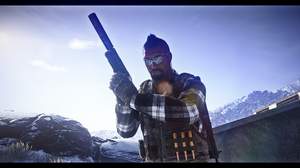
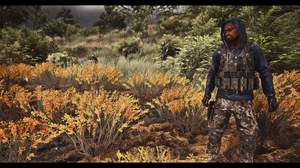
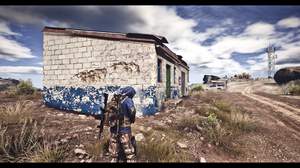
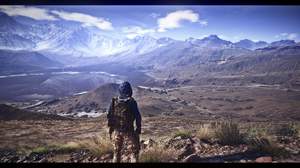
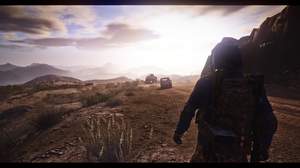
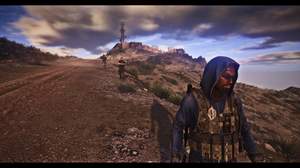
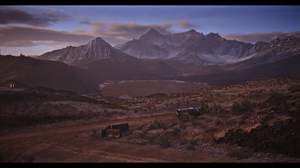
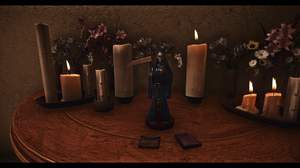
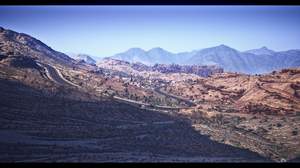
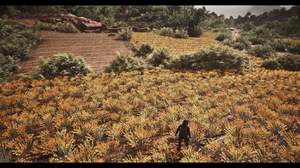
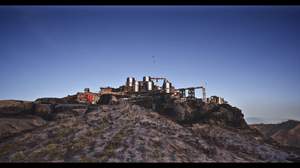
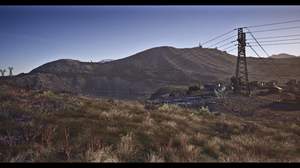
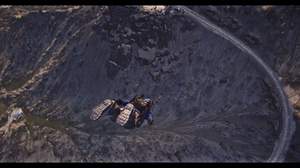
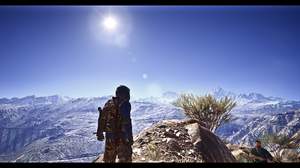
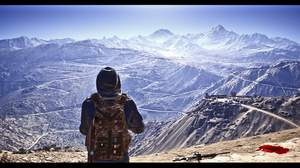
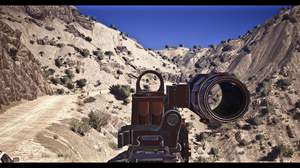
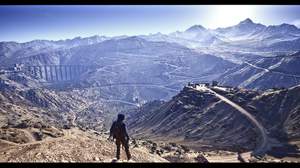
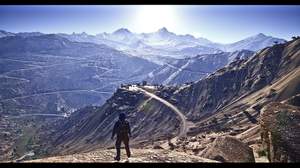
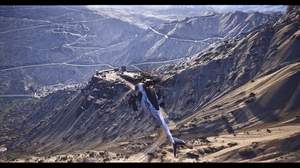
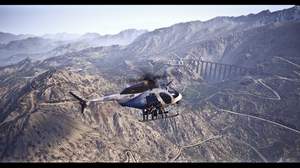
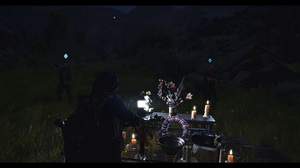
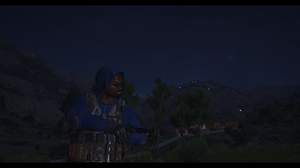
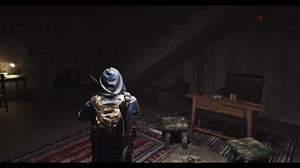
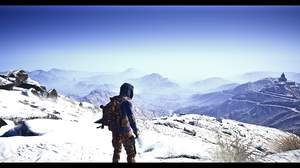
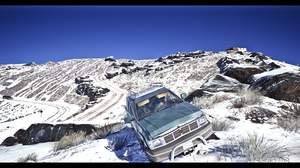
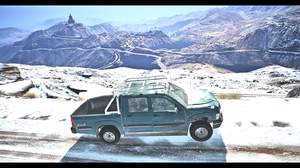
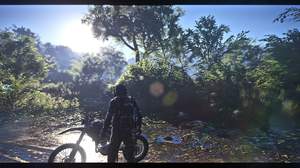
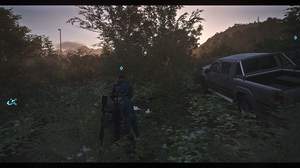
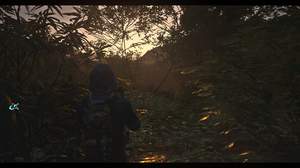
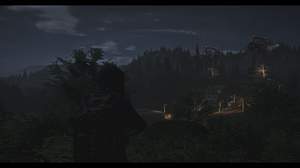
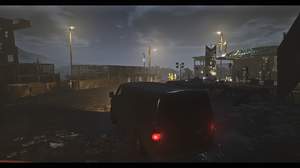
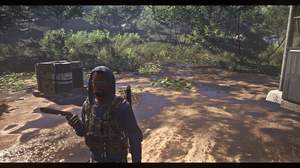
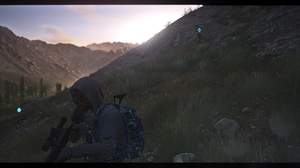
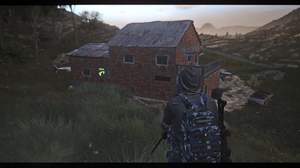
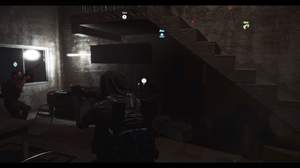
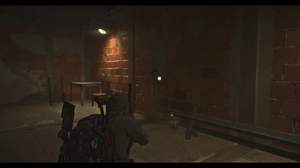
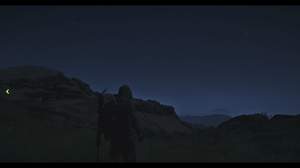
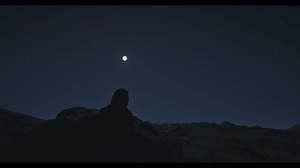
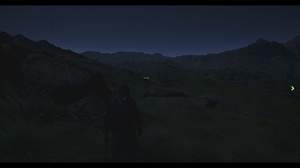
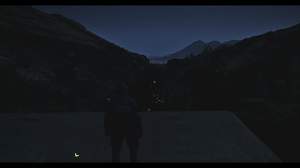
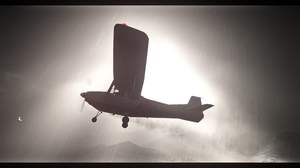
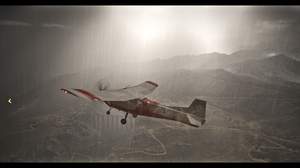
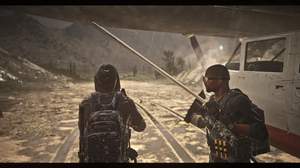
More pics coming soon. Feedback and requests greatly appreciated and welcome. I'll have a video out soon (probably tomorrow night but maybe sooner that gives a quick demo).
THANKS!